Gmail Filters: The Best Way to Declutter Your Inbox
Here is everything you need to know about how to create Gmail filters, and how they can clear your inbox, without any effort coming from you.
Table of contents
You certainly have a cluttered inbox, or at least will have one someday in your life. Well, if you have the right email management tactics to deal with the growing quantity of emails you receive every day, then you are safe. If you feel stressed when you see an inbox with 2,500 unread emails, you are probably not alone. A researcher at the University of California Irvine studied the effects of email access. After tracking the participants with heart rate monitors, they found that email can be a significant cause of stress. Yet, we can’t simply stop using email, mainly in the business context, where people build relationships within this communication tool. Newsletters, spam, and marketing emails are the main ones responsible for the clutter in our inboxes. And it’s possible to avoid this kind of email, controlling what it’s essential to you, at the same time that you organize your inbox. To do that, you can simply use tools and methods such as filters and labels, available on several if not all email providers. In this article, we are going to focus on how to create Gmail filters that will help you keep your inbox tidy and who knows even to achieve inbox zero in Gmail.
What are Gmail filters?
Gmail filters work as automation rules to handle incoming email messages. In other words, these rules automate the process of sorting out emails and organizing your inbox, saving the time you would spend doing it manually. So basically, you can set some criteria for each filter and also which action you want Gmail to take on any message that matches these criteria. For example, if you are receiving many newsletters from a specific sender, you can set a filter to make Gmail automatically archive or delete any message that comes from it. You won't have to see or deal with any boring newsletter or ad email anymore.
How to create a Gmail filter
There are three different ways of creating an email filter in Gmail. And it's interesting to know all of them because you are probably going to use all depending on the context you are in your inbox. The first one is the easiest: just go to the search bar and click the down arrow.  The other way is to create a new filter in Gmail, by going to the settings menu. Click the gear icon on the top-right of your window, then choose Settings. After that, select the tab Filters and Blocked Addresses, and click the Create a new filter link.
  And the third way is to create filters from an opened email. Just click on the three-dots on the top right of the email window and select Filter messages like these.
  On either of the three options a popup like this one will open:
  And we are going to explain each one of these elements, and what you need to do after setting the first popup.
Filter Criteria
Let's take a thorough look at each one of the criteria available, so you can understand what you can filter on Gmail.
- From: Filter emails sent from the email address you want to avoid.
- To: Filter the emails sent to a particular email address.
- Subject: Filter emails containing a specific subject line.
- Has the words: Filter emails with specified keywords on the body.
- Doesn't have: Filter emails that don't have the keywords you specify.
- Size: Filter emails larger or smaller than a specific size.
- Date within: Allows you to filter emails between a range of dates.
- Search: Filters in which folder the incoming emails will be so Google can perform what you have preset. For example, on the inbox, the Spam folder, or the Starred folder.
- Has attachment: Filter only emails that include an attachment.
- Don't include chats: Ignore messages from Google Chat (or Google Hangouts Chat) when this filter is on.
In case you opted to create a filter from an email message, notice that Gmail will fill the email address automatically in the criteria From. After selecting all the criteria you need to filter, just click the button Create filter. Then another pop-up will appear, containing the actions you want to trigger with the filter you are creating.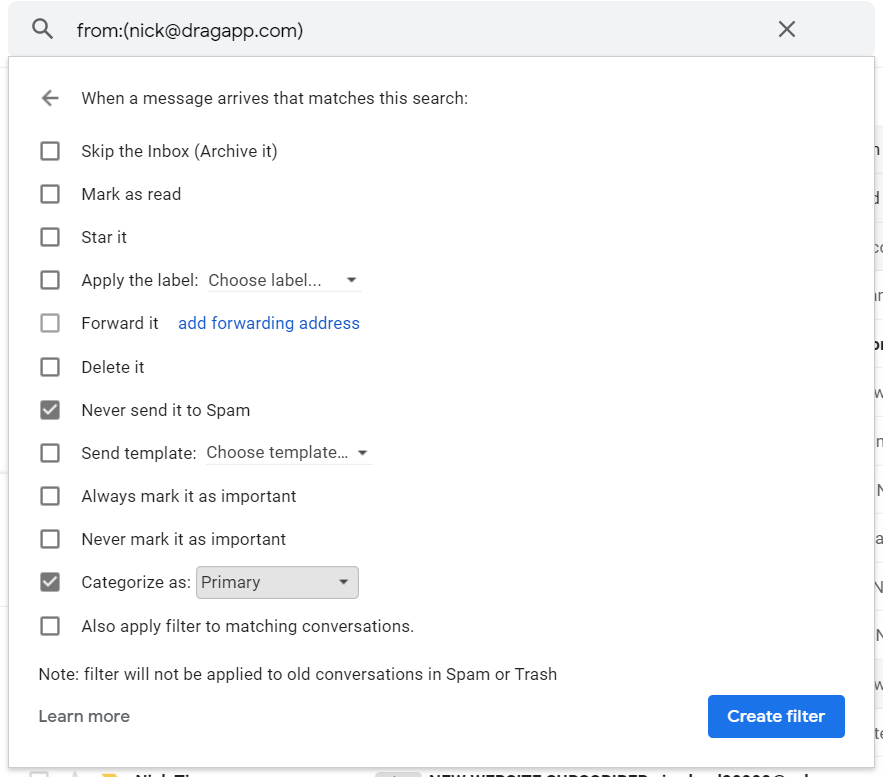
- Skip the inbox: Archive the emails, and you won't see them when they hit your inbox.
- Mark as read: The emails will appear in your inbox but as already-read items.
- Star it: Automatically put a star in the email.
- Apply the label: Apply a specific tag to the email, choosing it from the selection box right next to it.
- Forward it to: Automatically forward the email to another email address that you will need to add.
- Delete it: Send the email to the trash automatically.
- Send template: You can choose a model to send to the email address you pre-selected.
- Never send it to Spam: Prevents the emails to be tagged as spam.
- Always mark it as important: Automatically tag filtered emails as necessary.
- Never mark as important: Tell Gmail not to tag filtered emails as necessary.
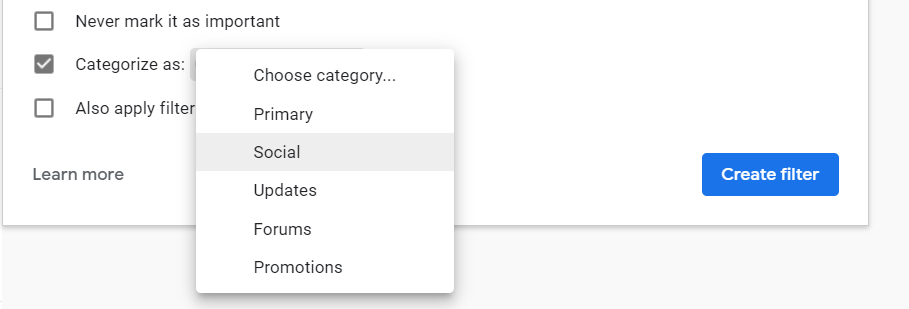
- Categorize as: Automatically categorize filtered emails, allowing you to choose between the different inboxes (Primary, Promotions, Social, or others).
- Also apply filter to matching conversations: This applies the conditions you have selected to every email in your account that meets the filter criteria you set.
Your filter is now ready, and you can simply click Create filter to conclude the process.
How to edit and delete Gmail Filters
Sometimes it can help that the filters aren't useful anymore, or you need to set more criteria than the ones you previously chose. So you can easily edit or delete your Gmail filters. Just click settings, represented by the gear icon, then choose the option Settings. Next, select the tab Filters and Blocked Addresses, and the list with all your filters will be displayed, and right next to each one of them, there will be the options to edit and delete.  When you click the option edit, a pop-up with all the filter conditions will open. Then you can save them and go to the next pop-up, that presents the action. After editing, just click Update Filter. To delete a filter, click on delete next to the filter you no longer wish to have in your inbox. Then just confirm the action selection Ok.
AI Platform
The inbox your team and your AI work in together
Shared inbox, live chat, and AI in Gmail, with an MCP server your AI tools can drive.
 How to export or import filters
After testing all the available automation, and becoming a master on Gmail filters, you may want to implement them in other accounts you may have, or even with friends that also need the organization miracle. If this is your case, it's possible to export and import filters. First, to export a filter go to settings ”the gear icon on the top right of the page” and choose the option settings from the list menu. Go to the tab Filters and Blocked Addresses. Next, mark the checkboxes of the filter you want to export and click the export button. When you click the export link, it generates an XML. This file download will start automatically.  You can either edit the XML file on a text processor or save it from importing it into another Gmail account. Now, to import a filter, do the same process of going to settings and the tab Filters and Blocked Addresses, so you can reach the Gmail filters list. Click the link import filter, and the section with the same name will appear right above this link. Then click the button Choose file and select the file containing the filter you wish to upload.
  Finally, click the button Open file next to the imported filter.
Gmail Filters Tips and Tricks
So far, you have seen how to create and set your filters, and it's pretty straightforward, right? Now it's time to see how to apply them to situations you may face every day with your emails. But first, take a look at this table that contains Google operators that can power up your filter settings. We are going to teach you how to apply them properly.
 How to delete all incoming emails and newsletters automatically
When your inbox gets to a point where there are hundreds or thousands of unread emails in the Primary inbox, your first reaction may be to start unsubscribing from all the marketing emails and newsletters. But you don't need to do that when Gmail can do this automatically with filters. Notice that most marketing emails go to the inbox Promotions, which you can easily select all and delete with two clicks. Still, some can get past it and go straight to the primary inbox. And we are going to teach you how to avoid them. When you set this filter, Gmail will send this kind of email to the trash, by watching for the word unsubscribe in the body of the message. Generally, this kind of message you don't want to receive contains this word at the bottom. We know that some newsletters bring great content to you, not just promotions, so you can include their email addresses using the operator -. Follow these steps:
- On Gmail's search box, click the down-arrow to open the filter popup.
- (Optional) Type the -(*@domain.com) into the From field, with the domain of newsletters you want to avoid deleting.
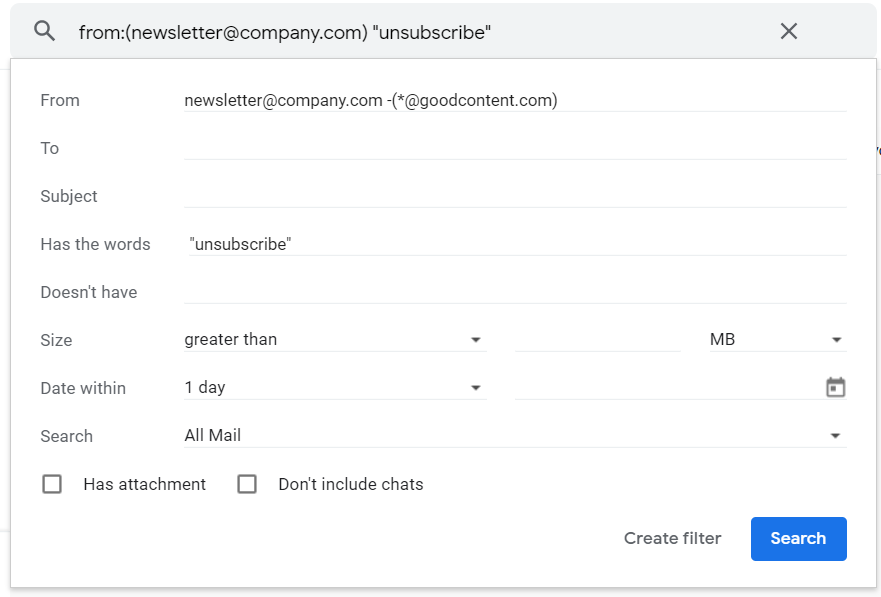
- Next, type unsubscribe in the field Has the words.
- Click the Create filter button.
- Then on the next popup, select the option Delete it.
- Finally, click the Create filter button.
Now, any email that contains unsubscribe will be automatically sent to Gmail's trash folder.
Applying the OR operator
If still marketing emails and newsletters are coming to your inbox, you can restrict your filter even more. Just add other words that these emails usually contain, besides unsubscribe. First, take a look at some of the marketing emails you have been receiving, and check if there is a pattern of words between them, such as click here, opt-out, or read it now. Once you find this pattern, go to your list of filters on Gmail settings, and click edit next to the filter you have set before. Next, you are going to add these keywords you found on the field Has the words altogether with Unsubscribe. Here is how you are going to type it: unsubscribe OR click here OR read it now OR opt-out. 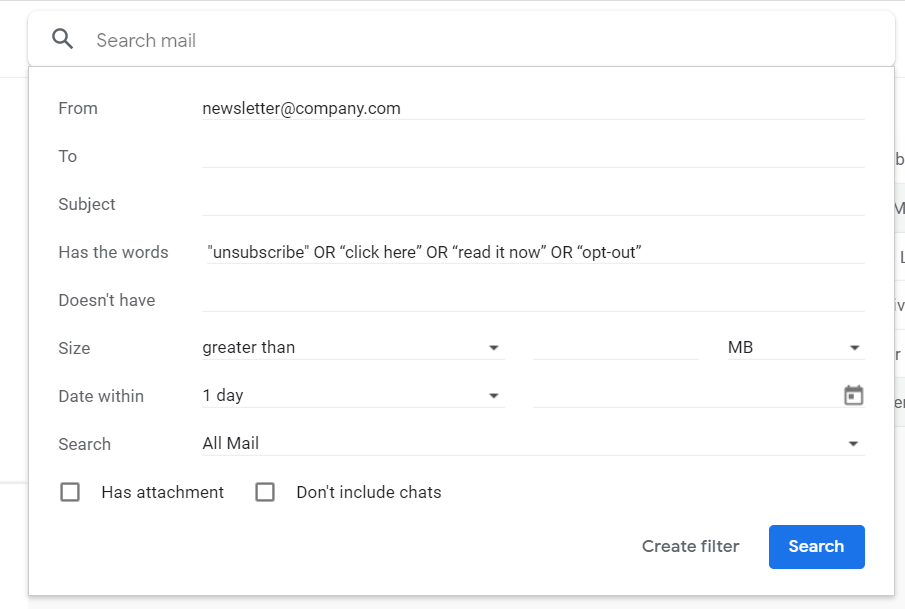
How to filter incoming emails from a particular sender
Filtering emails from a specific sender is useful when you want to stop receiving a bunch of email marketing or newsletters, that this person is sending. Usually, the ones that send too many emails and are cluttering your inbox with promotions, or things in which you are no longer interested. So you are going to learn how to batch delete, move the emails to other folders, or archive them, by creating a simple filter.
- Filtering the sender
The first step is to type the sender information on the field From of the create filter popup. You can type two kinds of information:
- The complete email address (e.g., susan@company.com), to filter only the emails by this person.
- The domain of the sender, (e.g., @company.com) to avoid receiving emails from any sender that has this domain
It is also possible to set specific contents on the messages, to filter some emails from the sender you have selected.
- Choose the action you want to apply
You can perform various actions, so Gmail handles these incoming emails the best way possible for you. Let's see the main ones:
- If you want to batch archive, the messages select the option Skip the Inbox (Archive it).
- To batch delete all the messages from the sender, select Delete it.
- To send these emails to another folder, select Categorize as: then choose the folder you wish they would arrive on.
An advanced addition to Gmail Filters
As you can see by now, email filters are fantastic for personal inboxes, helping you control and manage your inbox mainly because you handle just one mailbox. But when it comes to business email accounts, many companies need to share multiple inboxes in just one account, to achieve a productive workflow. That is why they usually seek shared inbox solutions to solve all the pain points in a collaboration that a regular Gmail account causes. For instance, imagine having three people sharing the same email account, and each one of them creating different filters. The chances are that these filters will conflict. On the other hand, a shared inbox like Drag can help teams to collaborate in a very different way. Each teammate has an email account, and inside their accounts, they can have more than one inbox: the personal and the shared ones. So, for example, a sales team needs to have the alias sales@company.com to contact their clients. With Drag, the inbox for this alias will be present on all the team members' accounts. And they will be able to see and interact with the emails on it in real-time. Drag works with its automation, very similar to Gmail filters indeed, but even more advanced. They help your team stay on the same page, making everything more straightforward and more understandable.
Summarizing
Now that you know how to create and set your filters properly, we hope that you can finally have an automated and organized inbox. You can rest assured that cleaning your Gmail inbox with these filters will save a lot of your time. You can even have more time to read another super cool article that we have here about organizing your Gmail. We bet that after getting more knowledge of the Gmail organization, you are going to fall in love with your new tidy inbox. And the stress caused by a cluttered inbox will no longer bother you.
Organize your Gmail seamlessly.
Co-founder
Co-founder at Drag, writing about Google Workspace, shared inboxes, and how teams actually run email.